Introduction
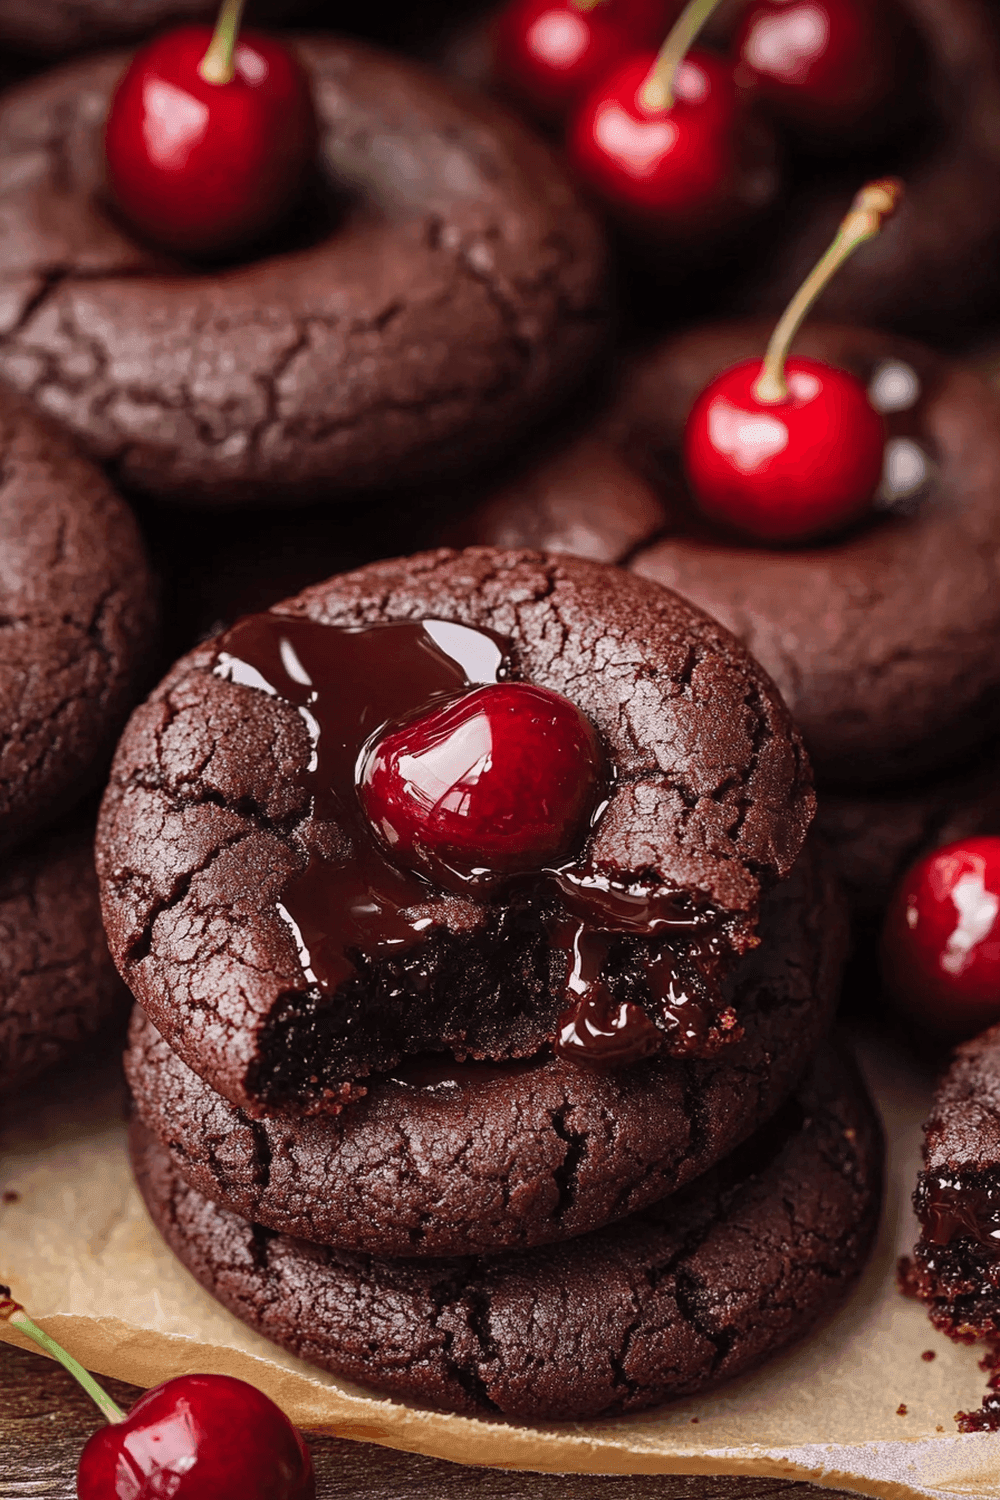
Chocolate Cherry Cookies are the perfect combination of rich chocolate flavor and the sweet tartness of cherries. Whether you are hosting a gathering or simply craving a delightful treat, these cookies will surely impress your taste buds. In this article, you’ll learn how to make these delicious cookies from scratch using simple ingredients that you may already have in your pantry. You’ll discover the joy of biting into a soft cookie filled with melted chocolate chunks and chewy dried cherries. Not only do they taste amazing, but their beautiful appearance also makes them a lovely addition to any dessert table.
Baking Chocolate Cherry Cookies is not just about satisfying your sweet tooth; it’s also a wonderful way to bond with family and friends in the kitchen. The aroma of freshly baked cookies wafting through your home is enough to bring everyone together. This recipe is easy to follow and perfect for bakers of all skill levels. So roll up your sleeves, grab your mixing bowls, and get ready for a fun baking adventure! By the end of this guide, you’ll be equipped with all the knowledge needed to bake mouthwatering Chocolate Cherry Cookies that will leave everyone asking for seconds.
What You’ll Need
To create these delectable Chocolate Cherry Cookies, gather the following essential equipment and ingredients. First, ensure you have measuring cups and spoons for accurate measurements; this is crucial for achieving the right balance of flavors. A mixing bowl will be necessary for combining your ingredients effectively. Additionally, an electric mixer can help speed up the process of creaming butter and sugar together.
Don’t forget about parchment paper! It will line your baking sheets, preventing the cookies from sticking and making clean-up a breeze. Lastly, a cooling rack will allow your freshly baked cookies to cool properly after coming out of the oven.
Now let’s dive into the core ingredients that make these cookies so special!
Ingredients with Precise Measurements
- All-Purpose Flour
All-purpose flour serves as the foundation of our cookie dough. It provides structure and stability while ensuring that our Chocolate Cherry Cookies achieve that perfect chewy texture we crave. Measuring out 2 cups gives us enough flour to create a substantial batch that can satisfy friends and family alike.
- Unsweetened Cocoa Powder
Cocoa powder is responsible for delivering rich chocolate flavor without adding extra sweetness. For this recipe, we use ½ cup of unsweetened cocoa powder which deepens the color and enhances the overall taste profile of our cookies.
- Granulated Sugar
Granulated sugar adds sweetness to our cookie dough while helping it maintain moisture during baking. We utilize 1 cup of granulated sugar in this recipe which balances well with the tartness of cherries.
- Brown Sugar
Using brown sugar adds depth and moisture due to its molasses content. Incorporating ½ cup results in soft and chewy Chocolate Cherry Cookies that everyone loves.
- Unsalted Butter
Unsalted butter is essential for creating a rich flavor base in our cookie dough. We recommend using ¾ cup (1 ½ sticks) at room temperature so it blends smoothly when mixed with sugar.
- Eggs
Eggs contribute to binding our ingredients together while providing moisture. For this recipe, we need 2 large eggs which help create a soft texture once baked.
- Baking Soda
Baking soda acts as a leavening agent, allowing our cookies to rise slightly during baking. Using just 1 teaspoon ensures our Chocolate Cherry Cookies don’t become too dense.
- Salt
A pinch of salt enhances all flavors in our cookie dough while balancing sweetness perfectly. Just ½ teaspoon is required for optimal flavor enhancement.
- Semi-Sweet Chocolate Chips
Chocolate chips are a must-have ingredient! They melt beautifully within each cookie when baked. We suggest adding 1 cup of semi-sweet chocolate chips for those gooey bites everyone loves.
- Dried Cherries
Dried cherries add natural sweetness and chewiness that complement the chocolate perfectly! Using 1 cup ensures every spoonful is packed with fruity goodness.
How to Make Chocolate Cherry Cookies
Step 1: Preheat Your Oven
Begin by preheating your oven to 350°F (175°C). This step is crucial as it ensures that your cookies bake evenly throughout their time in the oven. While waiting for your oven to heat up, prepare your baking sheets by lining them with parchment paper or silicone mat which helps prevent sticking during baking.
Step 2: Combine Dry Ingredients
In a medium-sized mixing bowl, whisk together all-purpose flour, cocoa powder, baking soda, and salt until everything is well combined. This step helps distribute all dry ingredients evenly so you won’t encounter clumps later on when mixing everything together! Set aside this dry mixture as you proceed with preparing your wet ingredients.
Step 3: Cream Butter & Sugars Together
In another large mixing bowl (or using an electric mixer), combine softened unsalted butter along with granulated sugar and brown sugar until light and fluffy—about three minutes on medium speed should suffice here! Scraping down sides occasionally ensures thorough mixing so there aren’t any lumps left behind either! Afterward add in both eggs one at a time beating well after each addition until fully incorporated into mixture—this adds richness throughout dough!
Step 4: Incorporate Dry Mixture
Gradually add dry mixture from earlier into wet mixture while stirring gently until just combined—be careful not to overmix as this could lead tough-textured cookies instead desired softness! Once incorporated well fold in semi-sweet chocolate chips along dried cherries ensuring even distribution throughout dough before moving onto next stage preparation!
Step 5: Scoop & Bake
Using a cookie scoop or tablespoon measure out portions onto prepared baking sheet leaving approximately two inches between each scoop (they will spread while baking!). Bake them in preheated oven for about ten minutes or until edges appear set but centers remain soft—keep an eye on them after eight minutes just in case!
Step 6: Cool & Enjoy
Once baked perfectly golden brown remove from oven letting cool on baking sheet five minutes before transferring onto wire rack completely cooling down—this step allows flavors meld together creating unique taste experience when enjoying later! Now you are ready enjoy delicious creations made right at home!

Serving and Storing Tips
Serving Suggestions
These delightful Chocolate Cherry Cookies make an excellent dessert option suitable for various occasions—from birthday parties to holiday gatherings! Serve them warm straight out of the oven alongside scoops vanilla ice cream or drizzle melted dark chocolate over top garnishing plate nicely presentation wise too! You can even pair them coffee tea providing comforting balance sweetness enjoyed anytime day!
Storing Leftovers
To ensure maximum freshness keep any leftover cookies stored airtight container at room temperature where they can last up week if stored properly! If longer storage needed consider freezing individual portions wrapped tightly plastic wrap placed inside freezer-safe bag lasting several months without losing quality flavor profile intact too!
With these steps followed closely you’ll master making irresistibly tasty Chocolate Cherry Cookies sure impress everyone who tastes them! Enjoy every bite guilt-free knowing they’re homemade love sprinkled throughout each batch created lovingly kitchen today!
Mistakes to avoid
When baking Chocolate Cherry Cookies, several common mistakes can hinder your results. One of the most frequent errors is not measuring ingredients accurately. Baking requires precision, and even a slight deviation in measurements can drastically affect the texture and flavor of your cookies. Always use a kitchen scale for dry ingredients and liquid measuring cups for wet components to ensure consistency.
Another mistake is overmixing the dough. While it’s tempting to mix until everything is perfectly blended, overmixing can lead to tough cookies. Mix just until the flour disappears, leaving a slightly sticky dough. This will yield soft, chewy cookies that melt in your mouth.
Using subpar ingredients is another pitfall. Quality matters when it comes to chocolate and cherries. Opt for high-quality chocolate chips or chunks and fresh or high-grade dried cherries. The flavor of your cookies will reflect the quality of the ingredients you use, so don’t compromise.
Another common error is baking at an incorrect temperature. Ensure your oven is preheated to the right temperature before placing your cookies inside. An oven thermometer can help verify accuracy, as many home ovens can be off by several degrees.
Lastly, neglecting cooling time can ruin your cookies’ texture. Allow them to cool on the baking sheet for a few minutes before transferring them to a wire rack. This step helps them set properly, ensuring they stay chewy rather than falling apart.

Tips and tricks
To create the best Chocolate Cherry Cookies, consider some helpful tips and tricks that enhance flavor and texture. First, chill your dough before baking. Refrigerating the dough for at least 30 minutes allows the flavors to meld and results in thicker cookies that maintain their shape during baking.
Experiment with different types of chocolate to elevate your cookie game. Dark chocolate provides a rich contrast to the sweetness of cherries, while milk chocolate offers a creamier texture. Combining both types can create a delightful balance that appeals to various palates.
Incorporate nuts into your recipe for added crunch and flavor depth. Chopped walnuts or pecans pair beautifully with chocolate and cherries, adding an extra layer of texture that enhances each bite.
Don’t forget about sea salt! A light sprinkle of flaky sea salt on top just before baking can elevate the overall taste profile of your Chocolate Cherry Cookies. It balances sweetness while enhancing flavors in unexpected ways.
Lastly, store your cookies correctly after baking to maintain freshness. Use an airtight container at room temperature for up to a week or freeze them for longer storage. Place parchment paper between layers when stacking in containers to prevent sticking.
Suggestions for Chocolate Cherry Cookies
When making Chocolate Cherry Cookies, consider these suggestions to enhance their appeal further. Start by adding spices such as cinnamon or vanilla extract into your dough; these flavors complement chocolate and cherries beautifully while adding warmth and complexity.
For an elegant presentation, consider drizzling melted chocolate over cooled cookies or dipping half of each cookie in chocolate before letting them set on parchment paper. This not only looks appealing but also adds an extra layer of chocolaty goodness that cookie lovers will appreciate.
If you’re looking for healthier alternatives without sacrificing taste, substitute some all-purpose flour with whole wheat flour or almond flour for added nutrients and fiber content without compromising on flavor or texture.
Think about customizing your cookie sizes too! Instead of traditional large cookies, make mini versions that are perfect for sharing at gatherings or parties. Adjust the baking time accordingly—smaller cookies typically bake faster than larger ones.
Finally, consider pairing these delectable treats with beverages like coffee or milk for a delightful experience. Offering pairing suggestions elevates your dessert menu and gives guests more reasons to enjoy these fabulous cookies!

FAQs
Can I use frozen cherries instead of fresh ones?
Yes! You can use frozen cherries in Chocolate Cherry Cookies; however, ensure they are thawed and drained well before incorporating them into the dough. Excess moisture from frozen cherries can lead to soggy cookies if not handled properly.
How do I store leftover Chocolate Cherry Cookies?
Store leftover Chocolate Cherry Cookies in an airtight container at room temperature for up to one week. If you want them to last longer, freeze them individually wrapped in plastic wrap or placed between layers of parchment paper in freezer-safe bags.
Can I make these cookies gluten-free?
Absolutely! To create gluten-free Chocolate Cherry Cookies, substitute all-purpose flour with gluten-free flour blends available in stores or homemade mixes using almond flour or coconut flour tailored for baked goods.
What type of chocolate works best?
The best type of chocolate depends on personal preference; dark chocolate chunks offer richness while semi-sweet varieties provide balanced sweetness alongside tartness from cherries. Experiment with combinations based on what you enjoy most!
Can I add other mix-ins besides cherries?
Certainly! Feel free to customize your Chocolate Cherry Cookies by adding other mix-ins like nuts (walnuts/pecans), dried fruits (cranberries/raspberries), or even different types of chocolates (white/milk) according to taste preferences!
How long do I need to chill the dough?
Chilling the dough for at least 30 minutes is ideal when making Chocolate Cherry Cookies; this step helps firm up the mixture so that it holds its shape better during baking while enhancing flavors as well!
Conclusion
Baking Chocolate Cherry Cookies is a delightful experience filled with opportunities for creativity and enjoyment. By avoiding common mistakes such as inaccurate measurements, overmixing doughs, and neglecting ingredient quality, you’ll ensure success every time you bake these treats. Consider helpful tips like chilling your dough before baking, experimenting with various chocolates, and including nuts for added texture; each suggestion enhances both flavor profiles significantly.
For those who wish to customize their creations further—don’t hesitate! Adding spices like cinnamon or drizzling melted chocolate over each cookie can take them from deliciously ordinary to exquisitely extraordinary! Remember proper storage techniques too; keeping leftovers fresh allows everyone around you—including yourself—to indulge whenever they crave something sweet!
By following these guidelines throughout every stage—from preparation through serving—you’ll master both technique & taste within this cherished dessert category! Happy baking!


